Professional blood collection techniques represent one of healthcare’s most fundamental yet critical procedures that every qualified medical professional must master. Blood collection, medically termed phlebotomy or venipuncture, involves the precise insertion of a sterile needle into a patient’s vein to obtain blood specimens for laboratory analysis, therapeutic blood removal, or blood donation. While these professional blood collection techniques may appear straightforward, they demand extensive technical expertise, flawless execution, and unwavering commitment to patient safety standards that define modern healthcare excellence.
The importance of mastering professional blood collection techniques cannot be overstated in contemporary medical practice. Laboratory results derived from blood samples drive approximately 70% of all clinical decisions, making specimen collection accuracy and integrity absolutely vital to positive patient outcomes. Poor execution of professional blood collection techniques can lead to hemolyzed samples, contaminated specimens, or pre-analytical errors that may result in misdiagnosis, inappropriate treatment protocols, or the necessity for painful repeat procedures that compromise both patient care and healthcare efficiency.
Critical Safety Warning and Legal Requirements
MANDATORY PROFESSIONAL REQUIREMENT: Professional blood collection techniques must be performed exclusively by licensed healthcare professionals who have successfully completed accredited phlebotomy training programs and demonstrated competency through comprehensive practical examinations. This guide serves solely as an educational resource and professional reference for qualified medical personnel seeking to enhance their venipuncture best practices.
Legal and Regulatory Compliance: In the United States and most developed nations, professional blood collection techniques operate under strict regulatory oversight. Healthcare facilities must maintain full compliance with:
- Clinical Laboratory Improvement Amendments (CLSI guidelines) regulations
- Occupational Safety and Health Administration (OSHA) blood draw safety standards
- State-specific licensing requirements for phlebotomy training technicians
- Institutional credentialing and competency validation programs
- The Joint Commission healthcare quality assurance standards
Serious Complications from Improper Technique:
- Permanent Nerve Damage: Irreversible disability from median, radial, or lateral antebrachial cutaneous nerve injury
- Arterial Puncture Recognition and Emergency Response:
- Blood Appearance: Bright red coloration with pulsatile, high-pressure flow pattern
- Flow Characteristics: Higher pressure with spurting or rhythmic pattern synchronized with heartbeat
- Immediate Action Required: Remove needle immediately and apply firm, direct pressure for minimum 10-15 minutes
- Documentation Requirements: Complete incident documentation and arrange for patient monitoring and follow-up care
Step 6: Blood Collection – Maintaining Specimen Quality Throughout Process
Vacuum Tube Collection Protocol and Best Practices:
Professional Tube Insertion Technique:
- Needle Stabilization: Maintain firm, steady grip on needle hub throughout entire collection process
- Tube Advancement: Push collection tube fully onto needle inside holder until vacuum seal is punctured
- Vacuum Activation: Ensure tube advances sufficiently to activate vacuum and initiate blood flow
- Flow Monitoring: Observe steady, consistent blood flow pattern into collection tube
- Volume Assessment: Allow tube to fill completely to manufacturer’s recommended fill level automatically
Multiple Tube Collection Management:
- Tube Order Compliance: Strictly follow established order of draw protocols to prevent cross-contamination
- Smooth Transitions: Remove and insert subsequent tubes smoothly while maintaining stable needle position
- Needle Stability: Maintain continuous attention to needle position throughout extended collection procedures
- Patient Comfort Monitoring: Assess patient tolerance and comfort during extended multi-tube collections
- Flow Assessment: Ensure adequate, consistent blood flow continues throughout entire collection process
Syringe Collection Method and Technique:
Controlled Aspiration Technique:
- Gentle Suction Application: Apply slow, steady, controlled pressure on syringe plunger
- Flow Rate Control: Adjust aspiration speed carefully to prevent hemolysis and cellular damage
- Volume Monitoring: Watch syringe graduation markings for accurate volume collection measurement
- Needle Position Maintenance: Maintain optimal needle position throughout entire aspiration process
- Vacuum Pressure Limitation: Avoid excessive negative pressure that could cause vein collapse or damage
Immediate Transfer Protocol for Syringe Collections:
- Rapid Transfer: Immediately transfer collected blood to appropriate tubes after collection completion
- Needle Safety: Remove needle from syringe before transfer or utilize approved safety transfer device
- Gentle Injection: Slowly inject blood down tube wall to prevent hemolysis and foam formation
- Proper Mixing: Gently invert tubes according to manufacturer’s specific recommendations
- Immediate Labeling: Label all specimens immediately to prevent potentially dangerous mix-ups
Collection Quality Assurance and Standards:
Hemolysis Prevention – Critical Quality Factor: Hemolysis, defined as the breakdown of red blood cells during collection or handling, represents one of the most common pre-analytical errors significantly affecting laboratory test results.
Primary Factors Contributing to Hemolysis:
- Inappropriate Needle Gauge: Needles smaller than 23 gauge significantly increase hemolysis risk
- Excessive Aspiration Rate: Rapid or forceful blood drawing causes mechanical cellular damage
- Improper Tube Mixing: Vigorous shaking instead of gentle inversion destroys red blood cells
- Temperature Extremes: Exposure to extreme hot or cold temperatures during transport or storage
- Collection Speed Issues: Excessive vacuum pressure or overly rapid flow rates
Evidence-Based Prevention Strategies:
- Appropriate Equipment Selection: Use proper needle gauge matched to collection volume requirements
- Gentle Technique Application: Avoid forceful aspiration, rapid tube changes, or aggressive handling
- Proper Mixing Protocol: Follow manufacturer’s inversion recommendations exactly as specified
- Prompt Processing: Ensure immediate delivery to laboratory for timely processing
- Temperature Control: Maintain appropriate storage temperatures during transport and processing
Volume Accuracy and Specimen Integrity:
- Fill Level Monitoring: Ensure all tubes fill to manufacturer’s recommended level for optimal results
- Additive Ratio Maintenance: Proper blood-to-additive ratios are absolutely critical for accurate test results
- Short Draw Recognition: Insufficient volume may significantly compromise test validity and reliability
- Overfilling Prevention: Excessive filling may dilute additives and compromise analytical accuracy
Patient Monitoring During Collection Process:
Vasovagal Reaction Recognition and Management:
- Early Warning Signs: Facial pallor, diaphoresis, complaints of nausea, dizziness, or feeling faint
- Progressive Symptom Development: Rapid pulse followed by bradycardia, decreased blood pressure, potential syncope
- Immediate Response Protocol: Stop procedure immediately, lower patient’s head below heart level, monitor vital signs
- Recovery Management: Maintain patient in supine position until all symptoms resolve completely
Pain Assessment and Management:
- Normal Discomfort Parameters: Brief, mild discomfort during initial needle insertion is expected
- Abnormal Pain Recognition: Shooting, burning, or severe pain may indicate nerve involvement or complications
- Response Protocol: Stop procedure immediately if severe or unusual pain occurs, assess for complications
- Patient Communication: Encourage patients to report any unusual sensations or significant discomfort immediately
Step 7: Procedure Completion and Comprehensive Post-Care
Tourniquet Release Protocol and Timing:
Critical Timing Considerations: The tourniquet must be released before needle removal to prevent hematoma formation, minimize patient discomfort, and ensure optimal wound healing.
Professional Release Technique:
- Collection Completion: Verify final collection tube has achieved adequate volume for testing requirements
- Tourniquet Identification: Locate tourniquet release end for quick, efficient tension release
- Release Methodology: Pull free end rapidly to release compression tension immediately
- Timing Verification: Ensure release occurs before needle removal from patient’s vein
- Circulation Assessment: Verify immediate restoration of normal circulation and skin color
Consequences of Improper Tourniquet Timing:
- Late Release: Results in hematoma formation, increased patient pain, and potential tissue damage
- Early Release: May cause inadequate specimen collection requiring repeat painful procedure
- Forgotten Release: Creates medical emergency requiring immediate intervention and patient monitoring
Professional Needle Removal Technique:
Pre-Removal Preparation Protocol:
- Gauze Positioning: Place clean, dry gauze pad directly over puncture site without applying pressure
- Patient Communication: Inform patient that needle removal is imminent
- Hand Positioning: Establish secure, comfortable grip on needle hub assembly
- Angle Maintenance: Keep needle at same angle as insertion for smooth, trauma-free removal
Safe Removal Process:
- Swift Motion: Remove needle using single, quick, confident movement
- Direction Control: Pull straight back along original insertion pathway
- Immediate Pressure Application: Apply firm, direct pressure with gauze pad immediately upon needle removal
- Safe Disposal: Immediately dispose of needle in approved sharps container using single-handed technique
Critical Safety Points for Needle Handling:
- Never Recap Policy: Under absolutely no circumstances should used needles be recapped
- Immediate Disposal: Needle must go directly into sharps container without delay
- Single-Handed Technique: Use approved single-handed disposal method for maximum safety
- Container Proximity: Sharps container should be positioned within easy arm’s reach
Post-Puncture Site Care and Monitoring:
Pressure Application Protocol:
- Duration Standards: Apply firm, consistent pressure for minimum 3-5 minutes
- Pressure Assessment: Pressure should be sufficient to completely stop bleeding without compromising circulation
- Patient Assistance: Provide assistance for elderly, weak, or impaired patients in maintaining adequate pressure
- Monitoring Requirements: Observe for continued bleeding, hematoma formation, or other complications
Extended Pressure Situations:
- Anticoagulant Therapy: Patients on blood-thinning medications may require 10-15 minutes of pressure application
- Bleeding Disorders: Patients with coagulation disorders may need extended pressure and enhanced monitoring
- Large Gauge Needles: Larger puncture wounds require longer pressure application for adequate hemostasis
- Difficult Punctures: Multiple attempts or traumatic punctures may necessitate extended post-procedure care
Professional Bandage Application:
- Site Assessment: Verify bleeding has completely stopped before bandage application
- Bandage Selection: Choose appropriate adhesive bandage or tape with gauze based on patient needs
- Application Technique: Apply securely without excessive tension that might compromise circulation
- Patient Instructions: Advise keeping bandage in place for 15-30 minutes minimum
- Activity Restrictions: Recommend avoiding heavy lifting with affected arm for remainder of day
Tube Collection Order: CLSI Standard Protocol Implementation

Clinical and Laboratory Standards Institute (CLSI Guidelines) Overview:
The systematic order of blood collection tubes follows rigorous protocols established by CLSI guidelines to prevent cross-contamination of additives that could significantly compromise laboratory test results. Each additive serves specific preservation and analytical purposes, and contamination between different tube types can lead to erroneous results with potentially serious clinical consequences that violate healthcare quality assurance standards.
Scientific Rationale for Standardized Collection Order: The established collection order is based on comprehensive analysis of:
- Additive Contamination Risk: Potential for carryover contamination between different tube types
- Clinical Impact Assessment: Severity of consequences resulting from contaminated or compromised results
- Additive Concentration Effects: Amount of additive contamination that could cause analytical interference
- Test Sensitivity Factors: Sensitivity of specific laboratory tests to trace contamination
Detailed Collection Order with Clinical Rationales:
1. Blood Culture Bottles (Sterile Collections) – Highest Priority:
- Priority Rationale: Absolute sterility is paramount; any contamination completely compromises diagnostic validity
- Collection Technique: Must be first draw to minimize contamination from needle or collection system
- Clinical Impact: False positive cultures lead to inappropriate antibiotic therapy and increased healthcare costs
- Special Considerations: May require separate venipuncture for optimal sterility maintenance per blood draw safety protocols
2. Light Blue Top Tubes (Sodium Citrate – 3.2% or 3.8%) – Coagulation Studies:
- Additive Purpose: Chelates calcium ions to prevent coagulation cascade activation during transport and storage
- Tests Performed: Prothrombin time (PT), activated partial thromboplastin time (aPTT), fibrinogen, D-dimer, specialized coagulation studies
- Contamination Sensitivity: Extremely sensitive to calcium or other ionic contaminants from subsequent tubes
- Fill Requirements: Must be filled to exactly 90% of stated volume for accurate coagulation results following CLSI guidelines
- Clinical Consequences: Contamination can falsely prolong or shorten clotting times, leading to inappropriate anticoagulation management
3. Red/Gold Top Tubes (Serum Separator Tubes) – Chemistry Panels:
- Additive Components: Contains clot activator (glass particles or thrombin) and inert gel separator barrier
- Processing Method: Blood clots naturally, serum separates above gel barrier after centrifugation
- Tests Performed: Comprehensive metabolic panels, cardiac markers, hormone assays, immunology studies
- Collection Advantages: No anticoagulant interference with chemistry assays, provides stable separated serum
- Contamination Risks: Anticoagulants from other tubes prevent proper clotting and serum separation
4. Green Top Tubes (Heparin – Lithium or Sodium) – Plasma Chemistry:
- Additive Mechanism: Enhances antithrombin III activity to prevent coagulation while preserving plasma
- Tests Performed: Arterial blood gases, electrolytes, stat chemistry tests, ammonia levels
- Plasma vs Serum: Provides plasma rather than serum for rapid analysis
- Contamination Issues: EDTA contamination can chelate essential ions needed for enzymatic assays
- Processing Speed: Faster turnaround time since no clotting time is required
5. Lavender/Purple Top Tubes (EDTA – K2 or K3) – Hematology Studies:
- Additive Function: Chelates calcium and other divalent cations to prevent coagulation
- Primary Use: Complete blood count (CBC), blood bank compatibility testing, molecular diagnostics
- Cell Preservation: Maintains cellular morphology for accurate microscopic examination
- Contamination Effects: Can chelate calcium in coagulation studies if carryover occurs
- Mixing Requirements: Requires immediate gentle inversion (8-10 times) for proper anticoagulation
6. Gray Top Tubes (Fluoride/Oxalate) – Glucose Preservation:
- Dual Additive System: Sodium fluoride (glycolytic inhibitor) and potassium oxalate (anticoagulant)
- Specific Use: Glucose measurements, lactate levels, alcohol testing
- Preservation Function: Prevents glucose breakdown by cellular glycolysis during transport and storage
- Collection Timing: Critical for accurate glucose results, especially important in diabetic monitoring
- Contamination Impact: Other additives can interfere with glucose measurement accuracy
Special Collection Considerations and Modifications:
Pediatric Collection Modifications:
- Volume Adjustments: Smaller pediatric tubes available for limited blood volume situations
- Order Flexibility: May need to prioritize most critical tests when total blood volume is severely limited
- Safety Considerations: Minimize total number of tubes to reduce patient trauma and discomfort
Emergency Department Protocols:
- Stat Requirements: May modify standard order for critical values needed for immediate patient care
- Trauma Situations: Point-of-care testing may take precedence over standard collection protocols
- Blood Bank Urgency: Type and crossmatch procedures may require priority collection status
Comprehensive Safety Protocols and Professional Best Practices
Infection Control: Multi-Layered Protection Strategy
Standard Precautions Implementation:
Standard precautions represent the fundamental foundation of infection control in all healthcare settings, requiring healthcare workers to treat all patients as potentially infectious for bloodborne pathogens regardless of known infection status.
Universal Application Principles:
- All Patient Contacts: Apply standard precautions consistently regardless of patient’s known infection status
- All Body Fluids: Treat blood and all body fluids as potentially infectious materials
- Barrier Protection: Use appropriate personal protective equipment for all patient interactions
- Safe Work Practices: Implement consistent safe work practices across all procedures
- Environmental Controls: Maintain clean, safe work environment with appropriate engineering controls
Bloodborne Pathogen Protection and Prevention:

High-Risk Pathogen Identification:
- Hepatitis B Virus (HBV): Highly contagious virus capable of surviving outside the body for extended periods
- Hepatitis C Virus (HCV): Leading cause of chronic liver disease requiring lifelong medical management
- Human Immunodeficiency Virus (HIV): Causes acquired immunodeficiency syndrome with serious health consequences
- Other Pathogens: Various bacteria, viruses, and parasites transmissible through bloodborne exposure
Comprehensive Transmission Prevention Strategies:
- Engineering Controls: Safety-engineered needles, puncture-resistant sharps containers, splash protection barriers
- Work Practice Controls: Strict no-recapping policy, immediate disposal protocols, comprehensive hand hygiene
- Personal Protective Equipment: Appropriate gloves, fluid-resistant lab coats, eye protection when indicated
- Administrative Controls: Comprehensive training programs, written policies, post-exposure management protocols
Needle Safety and Sharps Management Protocol:
Safe Needle Handling Practices:
- Absolute Never-Recap Rule: Complete prohibition on needle recapping under any circumstances
- Single-Use Policy: All needles and sharp instruments are designated single-use only
- Immediate Disposal: Dispose of all sharps immediately after use without delay
- Approved Containers: Use only approved, puncture-resistant sharps containers
- Fill Limitations: Never fill containers beyond 2/3 capacity, replace when full
Sharps Container Management Standards:
- Accessibility Requirements: Containers positioned within immediate reach of all work areas
- Stability Standards: Containers must be stable, puncture-resistant, and leak-proof
- Fill Level Monitoring: Replace containers when 2/3 full, never attempt to empty or reuse
- Proper Closure: Securely close and label containers according to facility protocols before disposal
- Safe Transportation: Follow established facility protocols for container transport and disposal
Post-Exposure Incident Management Protocol:
Immediate Response Protocol:
- Wound Care: Immediately flush puncture wounds with clean water, wash thoroughly with antimicrobial soap
- Mucous Membrane Exposure: Flush eyes or mouth with water or sterile saline for minimum 15 minutes
- Incident Documentation: Report exposure incident immediately to supervisor and infection control
- Medical Evaluation: Seek immediate medical assessment and evaluation
- Source Patient Identification: Identify source patient for testing when possible and appropriate
Comprehensive Follow-up Requirements:
- Baseline Testing: Test exposed healthcare worker and source patient when consent obtained
- Prophylaxis Evaluation: Consider post-exposure prophylaxis based on exposure risk assessment
- Serial Testing: Conduct follow-up testing at specified intervals per established protocols
- Work Restrictions: Implement temporary work restrictions when medically indicated
- Counseling Support: Provide comprehensive emotional support and risk communication counseling
Patient Safety: Comprehensive Risk Management
Vasovagal Reaction Management and Prevention:
Vasovagal reactions represent the most common adverse event associated with blood collection procedures, affecting approximately 1-5% of patients undergoing routine venipuncture.
Pathophysiology and Understanding:
- Trigger Mechanism: Fear, pain, anxiety, or psychological stress stimulates excessive vagal nerve response
- Physiological Response: Results in decreased heart rate and blood pressure leading to cerebral hypoperfusion
- Symptom Progression: Typical progression from pallor to nausea to diaphoresis to potential syncope
- Recovery Pattern: Usually demonstrates rapid, complete recovery with appropriate supportive care
Comprehensive Risk Factor Assessment:
- Previous History: Prior episodes of fainting during medical procedures or blood draws
- Age Factors: Teenagers and young adults demonstrate statistically higher risk
- Anxiety Level: Visible anxiety, fear of needles, or high stress levels
- Fasting Status: Prolonged fasting significantly increases vasovagal reaction risk
- Environmental Factors: Warm rooms, crowded spaces, or stressful environments
Evidence-Based Prevention Strategies:
- Patient Education: Provide clear, reassuring explanation of procedure to reduce anxiety
- Positioning: Utilize supine position for all high-risk patients
- Environmental Control: Maintain cool, comfortable room temperature and calm atmosphere
- Distraction Techniques: Engage patient in pleasant conversation during procedure
- Hydration: Encourage adequate hydration before procedure when clinically appropriate
Recognition and Emergency Response:
Early Warning Sign Identification:
- Physical Signs: Facial pallor, diaphoresis, rapid or shallow breathing patterns
- Patient Complaints: Nausea, dizziness, feeling faint, visual disturbances
- Behavioral Changes: Restlessness, increased anxiety, or unusual quietness
- Vital Sign Changes: Decreased blood pressure, rapid then slow pulse rate
Immediate Management Protocol:
- Procedure Cessation: Stop blood collection immediately upon recognition of symptoms
- Position Change: Lower patient’s head below heart level, elevate legs if possible
- Clothing Adjustment: Loosen restrictive clothing around neck and chest
- Cool Compress Application: Apply cool, damp compress to forehead or back of neck
- Ammonia Capsule: Use only if patient remains conscious and facility policy permits
- Vital Signs Monitoring: Monitor blood pressure, pulse, and respiratory status
- Recovery Time: Keep patient supine until all symptoms resolve completely
Advanced Life Support Readiness:
- Emergency Equipment: Ensure immediate accessibility to crash cart and emergency supplies
- Staff Training: Maintain current CPR and AED certification for all phlebotomy staff
- Communication: Know exact procedures for activating emergency response system
- Documentation: Complete thorough documentation of incident, response, and patient outcome
Hematoma Prevention and Management:
Formation Mechanisms and Risk Factors:
- Needle Through Vein: Puncturing both anterior and posterior vein walls
- Inadequate Pressure: Insufficient pressure application after needle removal
- Anticoagulant Therapy: Significantly increased bleeding risk in patients on blood thinners
- Multiple Attempts: Repeated puncture attempts increase cumulative tissue trauma
- Large Gauge Needles: Bigger puncture wounds demonstrate higher bleeding potential
Evidence-Based Prevention Strategies:
- Proper Technique: Appropriate needle angle and controlled depth advancement
- Single-Wall Puncture: Careful needle advancement to avoid through-and-through puncture
- Immediate Pressure: Apply firm, direct pressure immediately upon needle removal
- Adequate Duration: Maintain pressure for clinically appropriate time period
- Patient Education: Ensure patient understands proper post-procedure care instructions
Comprehensive Treatment Protocol:
- Ice Application: Apply ice pack to reduce swelling and provide pain relief
- Elevation: Elevate affected extremity above heart level when possible
- Pressure Maintenance: Continue intermittent pressure application as needed
- Monitoring: Observe for continued expansion, increased pain, or complications
- Pain Management: Provide appropriate over-the-counter pain relief recommendations
- Follow-up Scheduling: Arrange appropriate follow-up if hematoma is large or concerning
Nerve Injury Prevention and Management:
Essential Anatomical Knowledge: Understanding precise nerve locations in relation to common venipuncture sites is absolutely essential for preventing nerve injury, which can result in permanent disability and significant liability.
Median Nerve Anatomy and Risk:
- Anatomical Location: Courses through center of antecubital fossa, deep to median cubital vein
- High-Risk Areas: Deep punctures in median cubital area, especially with excessive probing
- Injury Symptoms: Numbness, tingling, or weakness in thumb, index, and middle fingers
- Prevention Strategy: Maintain superficial needle insertion, avoid deep probing or repositioning
Radial Nerve Considerations:
- Anatomical Location: Travels along lateral aspect of forearm and posterior hand
- Risk Areas: Lateral forearm puncture sites, especially near wrist
- Injury Symptoms: Weakness in wrist extension and finger extension movements
- Prevention Strategy: Avoid lateral forearm sites when alternative options available
Lateral Antebrachial Cutaneous Nerve:
- Anatomical Location: Runs along lateral border of antecubital fossa
- Risk Areas: Cephalic vein punctures, especially in thin patients
- Injury Symptoms: Numbness and tingling along lateral forearm
- Prevention Strategy: Prefer median cubital vein when anatomically available
Immediate Response to Suspected Nerve Contact:
- Patient Report Recognition: “Shooting pain,” “electric sensation,” numbness, or tingling
- Immediate Cessation: Stop needle advancement immediately upon patient complaint
- Gentle Withdrawal: Slowly withdraw needle to safer, more superficial position
- Site Reassessment: Choose completely different puncture site for collection attempt
- Documentation: Complete detailed incident documentation including patient symptoms
- Medical Referral: Arrange appropriate neurological evaluation and follow-up care
Specimen Handling and Quality Assurance Standards
Immediate Post-Collection Handling Protocol:
Labeling Requirements and Patient Safety: Proper specimen labeling represents a critical patient safety issue, as mislabeled specimens can lead to incorrect diagnoses, inappropriate treatments, and potentially life-threatening medical errors.
Essential Label Information Requirements:
- Patient Name: Complete full legal name as it appears in official medical record
- Date of Birth: Secondary patient identifier for verification purposes
- Medical Record Number: Unique patient identifier specific to healthcare facility
- Collection Date and Time: Exact date and precise time specimen was obtained
- Collector Identification: Initials, name, or identification number of person performing collection
- Specimen Type: Blood, serum, plasma, or other specimen type as appropriate
Professional Labeling Best Practices:
- Timing: Label all tubes immediately after collection completion, never pre-label tubes
- Location: Complete labeling at patient bedside or immediate collection site
- Verification: Double-check all information for complete accuracy before leaving patient
- Legibility: Use clear, legible handwriting or computer-generated printed labels
- Completeness: Ensure all required fields are completed fully and accurately
Tube Mixing Protocols and Standards:
Additive Distribution Importance: Proper mixing ensures uniform distribution of additives throughout blood specimen, preventing clot formation in anticoagulated tubes and ensuring accurate, reliable test results.
Tube-Specific Mixing Requirements:
EDTA Tubes (Lavender/Purple) – Hematology:
- Inversions Required: 8-10 complete, gentle inversions immediately after collection
- Timing: Mix immediately after collection to prevent microclot formation
- Technique: Gentle 180-degree inversions, never shake vigorously
- Critical Nature: Inadequate mixing causes microclots that invalidate hematology results
Citrate Tubes (Light Blue) – Coagulation:
- Inversions Required: 3-4 complete, very gentle inversions
- Gentleness Important: Prevents premature activation of coagulation factors
- Timing: Immediate mixing prevents partial coagulation factor activation
- Fill Requirements: Must be exactly 90% full for accurate coagulation results
Heparin Tubes (Green) – Chemistry:
- Inversions Required: 8-10 complete inversions for proper anticoagulation
- Purpose: Ensures uniform anticoagulant distribution throughout specimen
- Speed: Can tolerate slightly more vigorous mixing than citrate tubes
- Result Impact: Poor mixing results in fibrin formation and compromised results
Serum Tubes (Red/Gold) – Chemistry:
- Inversions Required: 5 complete inversions if clot activator is present
- Purpose: Activates clotting process uniformly throughout specimen
- Clotting Time: Allow 30-60 minutes complete clotting time before centrifugation
- Centrifugation: Required to separate clear serum from cellular components
Transport and Storage Considerations:
Temperature Requirements for Optimal Results:
- Room Temperature (20-25°C): Most routine chemistry and hematology testing
- Refrigerated (2-8°C): Certain hormones, enzymes, and specialized chemistry tests
- Frozen (-20°C or below): Special tests requiring frozen plasma or serum preservation
- Body Temperature (37°C): Some tests require maintenance at body temperature during transport
Time-Sensitive Specimen Management:
- Stat Tests: Immediate transport to laboratory for urgent patient care
- Blood Gas Analysis: Analysis required within 30 minutes of collection for accuracy
- Glucose Testing: Process within 1 hour of collection or use fluoride preservative tube
- Ammonia Levels: Keep specimen on ice, process immediately upon laboratory receipt
- Lactate Measurements: Minimize delay, keep on ice if any processing delay occurs
Transport Safety and Compliance:
- Leak-Proof Containers: Use secondary containment for all blood specimens
- Proper Sealing: Ensure all tubes are tightly closed and secure
- Upright Position: Transport all tubes in upright position when possible
- Temperature Maintenance: Use appropriate cooling or warming devices as required
- Chain of Custody: Maintain proper documentation for forensic or legal specimens
Special Populations: Tailored Clinical Approaches

Pediatric Phlebotomy: Specialized Considerations
Age-Specific Modifications and Techniques:
Neonates (0-28 days) – Special Care Requirements:
- Site Selection: Heel stick capillary collection preferred for most routine tests
- Volume Limitations: Strict maximum of 1% total blood volume per 24-hour period
- Equipment: Specialized microtainers, capillary tubes, and micro-collection devices
- Restraint: Minimal restraint techniques, gentle swaddling for comfort and security
- Pain Management: Oral sucrose, pacifiers, skin-to-skin contact with parent
Infants (1 month – 2 years) – Developmental Considerations:
- Venipuncture Sites: Dorsal hand veins, external jugular or scalp veins when necessary
- Needle Selection: 23-25 gauge butterfly needles for optimal control and comfort
- Restraint Requirements: Secure but gentle restraint with parental assistance
- Parent Involvement: Encourage parent presence for emotional comfort and support
- Collection Tubes: Pediatric-sized tubes to minimize total blood volume requirements
Children (2-12 years) – Cooperative Care:
- Site Preference: Antecubital fossa when patient anatomy and cooperation allow
- Needle Choice: 22-23 gauge needles typically appropriate for most collections
- Psychological Preparation: Age-appropriate explanation and preparation techniques
- Distraction Techniques: Electronic tablets, books, music, or engaging conversation
- Reward Systems: Stickers, certificates, or small prizes for cooperation and bravery
Adolescents (13-18 years) – Transition to Adult Care:
- Adult Techniques: Can often utilize standard adult procedures and equipment
- Privacy Considerations: May prefer parent absence during procedure
- Anxiety Management: Higher statistical risk for vasovagal reactions than adults
- Respect Autonomy: Include adolescent in decision-making and consent process
- Confidentiality: Understand legal requirements for patient privacy and confidentiality
Pediatric Pain Management Strategies:
Non-Pharmacological Methods:
- Topical Anesthetics: EMLA cream or lidocaine patches applied 60 minutes before procedure
- Comfort Positioning: Allow child to sit on parent’s lap or maintain upright position
- Distraction Techniques: Bubbles, age-appropriate music, videos, or favorite toys
- Environmental Modifications: Quiet rooms, dimmed lighting, comfortable temperature
- Breathing Exercises: Age-appropriate relaxation and breathing techniques
Pharmacological Options:
- Topical Anesthetics: Applied 60 minutes before procedure for optimal effectiveness
- Oral Sucrose: Highly effective for neonates and young infants during procedures
- Nitrous Oxide: Reserved for extremely anxious children in appropriate settings
- Conscious Sedation: Only in specialized settings with appropriately trained medical staff
Family-Centered Care Approach:
- Parent Presence: Encourage parent to remain present unless medically contraindicated
- Role Clarification: Establish clear expectations for parent involvement during procedure
- Support Provision: Help parents cope effectively with child’s distress and anxiety
- Education: Provide clear explanations to both child and parent appropriate to developmental level
- Cultural Sensitivity: Respect and accommodate family cultural practices and beliefs
Geriatric Phlebotomy: Age-Related Considerations
Physiological Changes in Elderly Patients:
Vascular System Changes:
- Vessel Fragility: Significantly increased capillary fragility and bruising tendency
- Sclerosis: Hardened, less flexible veins due to atherosclerotic changes
- Visibility: Decreased subcutaneous fat may make superficial veins more prominent
- Mobility: Decreased vessel mobility with increased tendency to roll during puncture
- Healing: Slower healing processes and increased risk of infection complications
Skin and Tissue Changes:
- Thinning: Markedly decreased skin thickness and reduced elasticity
- Fragility: Increased risk of skin tearing with adhesive tape removal
- Sensitivity: Greater sensitivity to adhesives and potential for allergic reactions
- Turgor: Decreased skin turgor significantly affects accurate vein assessment
- Temperature: Often feel cold, which can affect peripheral circulation
Medication Considerations and Interactions:
- Anticoagulants: Warfarin, heparin, newer oral anticoagulants significantly increase bleeding risk
- Antiplatelet Agents: Aspirin, clopidogrel substantially affect normal hemostatic function
- Corticosteroids: Long-term steroid use increases skin fragility and healing time
- Diuretics: May significantly affect hydration status and vein quality
Modified Techniques for Elderly Patients:
Equipment Selection Modifications:
- Needle Choice: Consider smaller gauge needles (22-23) for fragile, delicate veins
- Butterfly Needles: Provide superior control and gentler approach for fragile vessels
- Tourniquet Application: Apply with reduced pressure and shorter duration to prevent injury
- Tape Selection: Use gentle, low-adhesion medical tapes to prevent skin damage
Collection Technique Modifications:
- Positioning: Provide extra pillows and supports for comfort and stability
- Lighting: Utilize enhanced lighting for improved vein visualization
- Patience: Allow additional time for positioning, preparation, and patient comfort
- Communication: Speak clearly and loudly if necessary, repeat instructions for clarity
- Assistance: May require additional staff assistance for positioning and stabilization
Enhanced Post-Procedure Care:
- Extended Pressure: Apply pressure for longer duration due to medication effects on hemostasis
- Gentle Bandaging: Use minimal adhesive materials, check circulation after application
- Monitoring: Observe for delayed bleeding, hematoma formation, or other complications Puncture**: Life-threatening hemorrhage or pseudoaneurysm development
- Serious Infections: Cellulitis, septicemia, or bloodborne pathogen transmission
- Hematoma Formation: Significant tissue damage and prolonged patient discomfort
- Syncope-Related Injuries: Secondary trauma from vasovagal reactions and falls
Complete Analysis of Blood Collection Needles and Equipment

Butterfly Needles (Winged Infusion Sets): Advanced Technical Specifications
Butterfly needles, professionally known as winged infusion sets or scalp vein needles, represent specialized venipuncture equipment distinguished by their characteristic flexible plastic wings that enable precise handling and enhanced patient comfort during blood collection procedures.
Detailed Technical Specifications:
- Gauge Range: 19-27 gauge (higher numbers indicate smaller internal diameter)
- Length Parameters: Typically 0.5 to 1.5 inches in overall length
- Tubing Length: 6 to 12 inches of flexible, medical-grade clear plastic tubing
- Construction Materials: Surgical-grade stainless steel needle with FDA-approved biocompatible plastic components
- Bevel Engineering: Ultra-sharp, tri-faceted bevel design for minimal tissue trauma and smooth penetration
Clinical Applications and Target Patient Demographics:
- Pediatric Populations: Children under 12 years requiring gentle, controlled venous access
- Geriatric Patients: Elderly individuals with fragile, superficial, or compromised vascular systems
- Oncology Patients: Individuals undergoing chemotherapy with weakened vascular integrity
- Difficult Access Sites: Hand, wrist, and foot venipuncture when standard sites are unavailable
- Extended Collection Procedures: Multiple sample collections requiring sustained venous access
Clinical Advantages:
- Superior Maneuverability: Wing design provides exceptional grip and directional control during insertion
- Reduced Patient Discomfort: Flexible tubing minimizes needle movement within the vessel
- Immediate Visual Confirmation: Clear tubing allows instant visualization of blood return (flashback)
- Decreased Hemolysis Risk: Gentler blood flow reduces red blood cell destruction
- Versatile Patient Positioning: Accommodates challenging patient positions or unusual anatomical variations
Disadvantages and Cost Considerations:
- Higher Cost Factor: Approximately 2-3 times more expensive than standard straight needles
- Slower Collection Rates: Smaller gauge options and extended pathway reduce overall flow rate
- Air Introduction Risk: Tubing dead space may introduce air bubbles without proper priming technique
- Increased Disposal Volume: Larger size requires more sharps container capacity
Straight Needles with Vacutainer Systems: The Clinical Gold Standard
The straight needle-vacutainer system represents the most widely utilized professional blood collection techniques methodology in clinical laboratories worldwide, combining operational efficiency, reliability, and procedural standardization in one integrated platform that exemplifies venipuncture best practices.
System Engineering and Components:
- Needle Design: Double-ended needles featuring patient-side and tube-side bevels for optimal performance
- Hub Engineering: Color-coded plastic hubs indicating gauge size according to ISO international standards
- Holder Mechanism: Reusable plastic holders incorporating blood draw safety features and ergonomic grip design
- Vacuum Tube Integration: Precision-engineered fit ensuring consistent draw volumes and proper additive mixing
Gauge Selection Guide and Clinical Applications:
- 20 Gauge (Pink Hub): Large volume collections, blood bank procedures, viscous specimen handling
- 21 Gauge (Green Hub): Standard adult phlebotomy training applications, routine comprehensive metabolic panels
- 22 Gauge (Blue Hub): Standard adult draws, slightly compromised or smaller veins
- 23 Gauge (Orange Hub): Pediatric applications, difficult venous access, fragile vessels
Vacutainer Tube Technology and Engineering: Modern vacuum collection tubes utilize precisely calibrated negative pressure to ensure exact specimen volumes following CLSI guidelines. The vacuum strength calculation considers:
- Required tube volume specifications
- Expected blood component viscosity
- Additive-to-specimen dilution ratios
- Atmospheric pressure variations by altitude
System Advantages:
- Standardized Collection Volumes: Pre-measured vacuum ensures consistent sample-to-additive ratios per healthcare quality assurance standards
- Multiple Tube Capability: Single venipuncture enables collection of numerous specimens
- Contamination Risk Reduction: Closed system design minimizes bloodborne pathogen exposure
- Enhanced Efficiency: Faster collection times and streamlined laboratory workflow
- Quality Control Consistency: Standardized methodology reduces pre-analytical variables
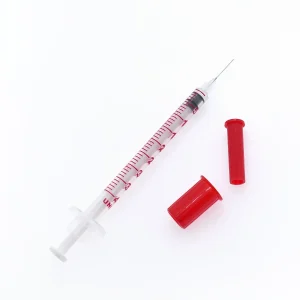
Syringe and Needle Method: Precision Control for Special Circumstances
The traditional syringe collection method, while less frequently used in routine practice, remains invaluable for specific clinical scenarios requiring precise control over collection parameters and specimen handling.
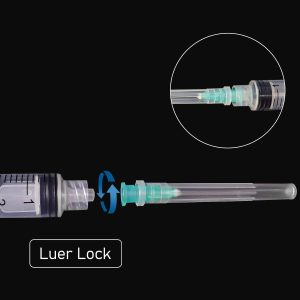
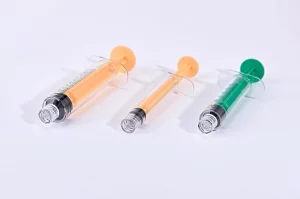
Technical Specifications and Options:
- Syringe Volume Range: 1mL (pediatric applications) to 60mL (therapeutic phlebotomy)
- Needle Selection Independence: Allows optimization of needle gauge and length for individual patient anatomy
- Connection Types: Luer-Lock versus Luer-Slip connections affecting security during collection
- Volume Measurement: Graduated markings enable precise volume determination during collection
Specific Clinical Indications:
- Blood Culture Collections: When contamination risk must be absolutely minimized
- Coagulation Studies: When gentle aspiration prevents premature specimen activation
- Fragile Vessel Management: When vacuum pressure might cause vein collapse
- Pediatric Collections: When precise volume control is absolutely critical
- Research Applications: When exact volumes or specialized handling protocols are required
Modified Collection Techniques: The syringe method requires technique modifications to prevent hemolysis and ensure optimal specimen integrity:
- Controlled Aspiration: Slow, steady pressure application prevents cellular damage
- Angle Adjustments: May require different insertion angles for optimal blood flow
- Immediate Transfer Protocols: Prompt transfer to appropriate tubes prevents clotting activation
Comprehensive Pre-Procedure Preparation
Patient Preparation: Building Trust and Ensuring Optimal Outcomes
Patient Identification Verification Process: Proper patient identification represents the cornerstone of safe phlebotomy practice and follows a systematic two-identifier verification protocol mandated by healthcare safety organizations:
- Primary Identification: Request patient to verbally state full legal name and date of birth
- Secondary Verification: Cross-check with identification bracelet, photo ID, or medical record number
- Documentation Cross-Reference: Compare all stated information with laboratory requisition forms
- Discrepancy Resolution: Document and resolve any inconsistencies before proceeding
- Special Population Protocols: Utilize guardian identification for minors or healthcare proxy for incapacitated patients
Informed Consent and Patient Education Process: While formal written consent typically isn’t required for routine blood draws, verbal consent and comprehensive patient education remain essential components of professional practice:
Key Educational Elements:
- Procedure Overview: Clear, concise explanation of the venipuncture process and timeline
- Realistic Discomfort Expectations: Honest discussion of potential pain, pressure, or brief discomfort
- Time Requirements: Accurate timeframe estimation for complete collection procedures
- Post-Procedure Instructions: Clear guidelines for wound care and activity restrictions
- Emergency Contact Information: How to reach healthcare providers with post-procedure concerns
Comprehensive Risk Assessment and Contraindications: Before initiating blood collection, healthcare providers must systematically evaluate potential contraindications and risk factors:
Absolute Contraindications:
- Explicit patient refusal or withdrawal of previously given consent
- Severe bleeding disorders without hematology specialist consultation and clearance
- Extensive burns or trauma affecting all potential venipuncture sites
- Documented severe needle phobia requiring specialized psychological intervention
Relative Contraindications Requiring Special Protocols:
- Anticoagulant Therapy: Extended pressure application and monitoring may be required
- Severe Thrombocytopenia: Platelet counts below 50,000/μL significantly increase bleeding complications
- Lymphedema: May require physician approval and special precautions for affected extremity use
- Previous Severe Adverse Reactions: Require enhanced monitoring, emergency preparedness, and modified techniques
Optimal Patient Positioning Strategies:
Seated Position (Preferred for Alert, Stable Patients):
- Chair Specifications: Sturdy, stationary chair with adjustable armrests and appropriate weight capacity
- Arm Support System: Firm, height-adjustable armrest positioned at optimal collection angle
- Postural Support: Adequate back and lumbar support to prevent patient fatigue during procedure
- Stability Requirements: Both feet positioned flat on floor with secure footing
- Emergency Accessibility: Clear pathways for rapid medical emergency response access
Supine Position (Recommended for High-Risk Patients):
- Surface Requirements: Examination table or hospital bed with adequate width and support
- Head Positioning: Slight elevation with pillows, arm supported at heart level or slightly below
- Safety Features: Appropriate use of side rails based on individual fall risk assessment
- Emergency Equipment: Immediate accessibility to crash cart, suction equipment, and emergency medications
Equipment Preparation and Quality Assurance
Strategic Needle Selection Criteria: Optimal needle selection requires careful consideration of multiple patient-specific and procedural factors:
Patient-Specific Factors:
- Age and Physical Development: Pediatric patients typically require 23-25 gauge needles for safety and comfort
- Vein Characteristics Assessment: Large, stable vessels can accommodate larger gauge needles (20-21 gauge)
- Skin and Tissue Thickness: Obese patients may require extended length needles (1.5 inches)
- Medical History Considerations: Previous difficult collections may indicate need for specialized equipment
Procedure-Specific Requirements:
- Total Sample Volume Needs: Large volume requirements benefit from larger gauge needles for efficiency
- Specific Test Requirements: Certain laboratory assays may require particular collection methods or equipment
- Time Constraints: Emergency or stat situations may necessitate faster flow rates
- Multiple Tube Collections: Consider total procedure duration and cumulative patient comfort
Comprehensive Equipment Quality Assurance: All phlebotomy equipment must undergo systematic quality verification before patient contact:
Detailed Visual Inspection Protocol:
- Needle Integrity Assessment: Thorough inspection for bent, damaged, dull, or defective needles
- Expiration Date Verification: Confirm all components remain within manufacturer’s expiration parameters
- Package Integrity Evaluation: Ensure sterile packaging remains intact, undamaged, and properly sealed
- Hub Security Confirmation: Verify needle attachment security and proper threading
- Vacuum Tube Functionality: Test vacuum integrity and proper seal function
Sterility Maintenance Protocols:
- Optimal Storage Conditions: Maintain all equipment in clean, dry, temperature-controlled environment
- Aseptic Handling Procedures: Utilize sterile technique when opening packages and handling equipment
- Contamination Prevention: Never contact needle tips, tube interiors, or other sterile surfaces
- Single-Use Compliance: Strict adherence to single-use policy for all needles and collection devices
Anatomical Site Selection: Foundation for Successful Outcomes

Primary Venipuncture Sites – Antecubital Fossa Anatomy:
The antecubital fossa, anatomically located at the anterior elbow flexure, contains the principal veins utilized for routine blood collection. Comprehensive understanding of anatomical relationships and vessel characteristics proves crucial for successful venipuncture outcomes.
Median Cubital Vein – The Premier Choice:
- Anatomical Position: Courses diagonally across the antecubital fossa, creating a bridge between cephalic and basilic venous systems
- Clinical Advantages:
- Greatest stability with minimal tendency to roll during needle insertion
- Largest diameter readily accommodates various needle gauge selections
- Excellent support from surrounding connective tissue and fascia
- Minimal risk of arterial puncture or peripheral nerve injury
- Palpation Characteristics: Feels firm, resilient, and demonstrates rapid refill when compressed and released
- Anatomical Variation: Present in approximately 85% of the general population
Cephalic Vein – Dependable Secondary Option:
- Anatomical Course: Extends along the radial (thumb) side of the forearm and upper extremity
- Clinical Features:
- Generally follows straight course with minimal branching patterns
- Moderate stability, superior to basilic but inferior to median cubital
- Somewhat reduced blood flow volume compared to median cubital vein
- Special Technique Considerations: May appear more superficial in thin patients, requiring careful depth control
Basilic Vein – Use with Enhanced Caution:
- Anatomical Location: Runs along the ulnar (fifth finger) side of the forearm
- Significant Risk Factors:
- Dangerous proximity to brachial artery and median nerve structures
- Substantially higher risk of inadvertent arterial puncture
- Greater mobility and tendency to roll away from needle during insertion attempts
- Limited Use Indications: Reserve for situations when alternative sites are unavailable and practitioner possesses advanced skills
Secondary and Alternative Collection Sites:
Hand Vein Venipuncture Techniques:
- Dorsal Hand Veins: Superficial vessels visible on the posterior hand surface
- Clinical Indications: When standard antecubital sites are compromised, scarred, or inaccessible
- Technical Modifications:
- Require smaller gauge needles (23-25 gauge) due to vessel size limitations
- Generally more uncomfortable for patients due to increased nerve density
- Higher complication rates including infiltration and hemolysis
- Limited sample volumes achievable due to reduced flow rates
Forearm and Wrist Alternative Sites:
- Radial and Ulnar Forearm Veins: Vessels located between wrist and antecubital regions
- Specialized Applications: Extended IV access requirements, emergency access when standard sites unavailable
- Enhanced Risk Profile: Higher complication rates requiring advanced training and experience
Anatomical Sites Requiring Absolute Avoidance:
Medical Contraindication Sites:
- Active Hematoma Areas: Regions with ongoing bleeding or recent hematoma formation
- Infection or Inflammation Sites: Areas affected by cellulitis, phlebitis, or other inflammatory processes
- Scar Tissue Regions: Keloid formations, surgical scars, or areas with significant fibrosis
- Edematous Locations: Areas with fluid accumulation that compromises successful venipuncture
- Burn or Trauma Sites: Recent injury locations requiring adequate healing time
High-Risk Anatomical Danger Zones:
- Arterial Proximity Areas: Locations where major arteries run superficially near target veins
- Peripheral Nerve Pathways: Sites where major nerve structures could sustain damage
- Active Lymphatic Regions: Areas with compromised or overactive lymphatic drainage
- Bony Prominence Areas: Locations where needle contact with underlying bone structures is possible
Detailed Step-by-Step Venipuncture Methodology

Step 1: Hand Hygiene and Personal Protective Equipment Protocol
Comprehensive Hand Hygiene – Infection Control Foundation:
Proper hand hygiene represents the single most effective intervention for preventing healthcare-associated infections and cross-contamination during phlebotomy procedures.
Alcohol-Based Hand Sanitizer Method (Preferred when hands lack visible contamination):
- Product Selection: Utilize alcohol-based sanitizer containing 60-80% ethanol or isopropanol concentration
- Volume Application: Apply sufficient product volume (typically 3-5mL) to completely cover all hand surfaces
- Technique Execution:
- Vigorously rub palms together using circular motions
- Interlace fingers and thoroughly rub between all digits
- Rub back of each hand using opposite palm in circular pattern
- Clean fingertips by rubbing in circular motions against opposite palm
- Rub each thumb using clasped opposite hand technique
- Continue vigorous rubbing until hands achieve complete dryness (minimum 15-20 seconds)
Traditional Soap and Water Method (Mandatory when hands show visible contamination):
- Water Temperature: Use comfortably warm water to optimize soap effectiveness and user comfort
- Soap Application: Apply sufficient antimicrobial soap quantity to completely cover both hands
- Scrubbing Methodology:
- Scrub all hand surfaces for minimum 20-second duration
- Pay particular attention to fingernails, cuticles, and interdigital spaces
- Utilize nail brush for heavily soiled fingernails or extended nail length
- Thorough Rinsing: Completely rinse with clean water, directing flow from wrists toward fingertips
- Proper Drying: Use single-use paper towels exclusively, avoid air-drying systems in clinical environments
Personal Protective Equipment Selection and Application:
Strategic Glove Selection Criteria:
- Material Considerations: Nitrile material preferred over latex due to allergy prevention and superior puncture resistance
- Proper Size Fitting: Correctly fitted gloves prevent tearing while maintaining optimal manual dexterity
- Powder-Free Options: Reduces contamination risk and minimizes allergic reaction potential
- Quality Standards: Use exclusively medical-grade gloves meeting FDA regulatory standards
Proper Glove Application Technique:
- Hand Preparation: Ensure hands achieve complete cleanliness and total dryness
- Quality Inspection: Check thoroughly for tears, holes, or manufacturing defects
- Application Process:
- Insert hands completely, ensuring full finger coverage to tips
- Smooth out all air bubbles and wrinkles for optimal fit
- Verify proper fit, comfort, and unrestricted finger movement
- Minimize touching of exterior glove surfaces to maintain cleanliness
Additional PPE Requirements:
- Laboratory Coats: Fluid-resistant materials with appropriate length to cover personal clothing
- Eye Protection: Required when splash or splatter risk exists during procedures
- Face Masks: Utilize when respiratory protection or droplet precautions are clinically indicated
Step 2: Advanced Patient Setup and Environmental Optimization
Patient Positioning for Optimal Venous Access:
Seated Position Optimization Protocol: The seated position represents the preferred patient positioning for routine venipuncture in ambulatory care settings, offering optimal venous access while maintaining patient comfort and procedural safety.
Chair Selection and Configuration:
- Stability Requirements: Chair must demonstrate complete stability without wheels, swivel capability, or movement potential
- Armrest Specifications: Height-adjustable armrest capable of accommodating various patient heights and arm lengths
- Height Adjustment: Chair height adjusted to allow patient’s feet to rest flat on floor surface
- Back Support: Adequate lumbar and thoracic support to prevent patient fatigue during extended procedures
- Safety Features: Emergency lowering capability and unobstructed access for medical emergency response
Optimal Arm Positioning Protocol:
- Extension Angle: Arm positioned in full extension with slight downward slope toward collection point
- Support Surface Requirements: Firm, clean surface covered with disposable protective barriers
- Height Alignment: Venipuncture site positioned at or slightly below patient’s heart level
- Stabilization Methods: Arm securely supported to prevent movement during needle insertion and collection
Environmental Factor Optimization:
- Lighting Requirements: Adequate illumination intensity to clearly visualize superficial and deeper veins
- Temperature Control: Maintain warm room temperature to promote peripheral vasodilation
- Privacy Measures: Ensure visual and auditory privacy for patient comfort and HIPAA compliance
- Emergency Access: Maintain clear pathways for rapid medical emergency response team access
Supine Position (High-Risk Patient Management):
Clinical Indications for Supine Positioning:
- Documented history of syncope or vasovagal reactions during medical procedures
- Pediatric patients requiring physical restraint for safety
- Patients with orthostatic hypotension or cardiovascular instability
- Anxious patients demonstrating high risk for vasovagal response
- Patients requiring multiple tube collections or extended procedure duration
Bed/Table Positioning Specifications:
- Head Elevation: Slight elevation (15-30 degrees) for patient comfort and optimal positioning
- Arm Support: Strategic use of pillows or specialized supports for proper arm positioning
- Safety Rails: Appropriate utilization based on individual patient fall risk assessment
- Emergency Equipment: Ensure immediate accessibility to suction equipment, oxygen, and emergency crash cart
Step 3: Tourniquet Application and Comprehensive Vein Assessment
Tourniquet Selection and Performance Characteristics:
Standard Latex Tourniquet Systems:
- Material Properties: High-quality flexible rubber providing consistent, controllable compression
- Width Specifications: Typically 1 inch width for optimal pressure distribution without tissue damage
- Length Requirements: 16-18 inches total length allows proper application technique and secure fastening
- Reusability Factors: Can be cleaned and reused multiple times if contamination hasn’t occurred
Disposable Tourniquet Options:
- Single-Use Design: Completely eliminates cross-contamination risk between patients
- Material Variations: Available in paper, plastic, or specialized fabric options
- Cost-Benefit Analysis: Higher per-use cost offset by improved infection control and safety
- Environmental Considerations: Disposal requirements and environmental impact assessment
Professional Tourniquet Application Technique:
Anatomical Placement Guidelines:
- Distance from Puncture Site: Position 3-4 inches proximal to intended venipuncture location
- Anatomical Landmarks: Typically placed on upper arm musculature, avoiding direct antecubital fossa placement
- Pressure Point Avoidance: Position over muscle mass rather than directly over bony prominences
Systematic Application Method:
- Initial Positioning: Place tourniquet underneath patient’s arm at predetermined location
- Tension Application: Pull both ends simultaneously to create appropriate compression tension
- Securing Technique: Tuck one end underneath the other to create easily accessible quick-release mechanism
- Pressure Validation: Verify appropriate pressure application without compromising arterial circulation
Pressure Assessment and Safety Validation:
- Pulse Verification: Radial pulse must remain easily palpable after tourniquet application
- Circulation Assessment: Hand and fingers should maintain normal color and temperature
- Patient Comfort: Should feel snug and secure but not cause significant pain or discomfort
- Time Limitation: Maximum application duration of 1-2 minutes to prevent tissue damage and complications
Advanced Vein Assessment and Selection:
Systematic Visual Inspection Techniques:
- Lighting Optimization: Utilize adequate lighting, consider specialized vein transillumination devices when available
- Surface Anatomy Analysis: Identify all visible veins and carefully assess their anatomical course
- Color Assessment: Healthy veins typically appear blue-green coloration under normal skin
- Size Estimation: Compare visible vein diameter to selected needle gauge requirements
Professional Palpation Methods and Techniques:
Gentle Palpation Protocol:
- Finger Selection: Use index finger pad exclusively for optimal tactile sensitivity
- Pressure Application: Apply light, consistent pressure to accurately assess vein characteristics
- Movement Pattern: Palpate along entire visible vein course to assess continuity and quality
- Comparative Assessment: Compare findings between both arms when anatomically possible
Comprehensive Vein Quality Assessment Criteria:
Excellent Venipuncture Candidate Characteristics:
- Firmness: Vein demonstrates firm, resilient feel when palpated with appropriate pressure
- Adequate Size: Sufficient diameter to accommodate selected needle gauge without difficulty
- Stability: Minimal lateral movement when palpated, remains in consistent position
- Rapid Refill Rate: Quick refill when compressed and released, indicating good circulation
- Accessible Depth: Easily reachable without requiring excessive needle depth or probing
Marginal Venipuncture Candidate Indicators:
- Soft or Spongy Texture: May indicate compromised vessel wall integrity or poor blood flow
- Small Diameter: May require smaller gauge needle selection or alternative site consideration
- Rolling Tendency: Mobile veins that move away from needle approach, requiring stabilization
- Slow Refill Pattern: May indicate compromised circulation or peripheral vascular disease
- Deep Location: May require longer needle length or specialized insertion technique
Unsuitable Vein Characteristics:
- Hard or Cord-like Feel: Indicates vessel sclerosis, thrombosis, or previous damage
- Pulsatile Nature: May indicate arterial vessel rather than venous structure
- Inflamed or Tender Areas: Signs of active phlebitis, infection, or inflammatory process
- Recent Puncture Sites: Areas of recent venipuncture showing healing or inflammation
Step 4: Site Disinfection – Critical Infection Control Protocol
Antiseptic Agent Selection and Properties:
70% Isopropyl Alcohol (Standard Clinical Practice):
- Mechanism of Action: Denatures bacterial proteins and dissolves lipid components in cellular walls
- Effectiveness Spectrum: Highly effective against vegetative bacteria, most viruses, and common fungi
- Required Contact Time: Minimum 30-60 seconds contact time for optimal antimicrobial efficacy
- Clinical Advantages: Rapid antimicrobial action, low cost, readily available in most healthcare settings
- Known Limitations: Not effective against bacterial spores, may cause skin drying with repeated applications
Alternative Antiseptic Options for Enhanced Protection:
Chlorhexidine Gluconate (2% or 4% Concentration):
- Enhanced Antimicrobial Efficacy: Broader spectrum antimicrobial activity compared to standard alcohol
- Residual Antimicrobial Activity: Continues antimicrobial action for hours after initial application
- Preferred Clinical Applications: Blood culture collections and high-risk procedures requiring enhanced sterility
- Cost Considerations: Significantly more expensive, potential for rare but serious allergic reactions
Povidone-Iodine Solutions (10% Standard):
- Broad Spectrum Activity: Effective against bacteria, viruses, fungi, and bacterial spores
- Specialized Applications: Blood culture collections, surgical procedures, high-contamination-risk situations
- Usage Limitations: Requires longer contact time, causes temporary skin and clothing staining
- Important Contraindications: Iodine allergies, hyperthyroidism, and certain thyroid disorders
Professional Disinfection Technique and Methodology:
Standard Alcohol Prep Pad Application:
- Starting Position: Begin at center point of intended puncture site
- Movement Pattern: Use consistent outward spiral motion to cover 2-3 inch diameter area
- Pressure Application: Apply firm, consistent pressure to ensure adequate skin-to-antiseptic contact
- Single-Use Principle: Use fresh prep pad for each cleaning attempt, never reuse or backtrack over cleaned areas
- Drying Time: Allow complete natural air drying for minimum 30-60 seconds before needle insertion
Critical Disinfection Principles and Standards:
- Absolute No-Touch Rule: Never touch or contact disinfected area after cleaning completion
- Natural Air Drying: Avoid blowing, fanning, or artificial drying to prevent recontamination
- Complete Coverage: Ensure entire intended puncture area receives thorough antiseptic coverage
- Adequate Contact Time: Allow sufficient time for complete antimicrobial action before proceeding
- Fresh Supply Usage: Use new, unopened prep pad for each individual cleaning attempt
Enhanced Blood Culture Collection Disinfection Protocol: Blood culture specimens require enhanced disinfection protocols due to the critical importance of sterile specimen collection:
- Dual Antiseptic Method: Initial cleaning with alcohol followed by chlorhexidine or iodine application
- Extended Contact Duration: Allow 2-3 minutes minimum contact time for each antiseptic agent
- Expanded Cleaning Area: Clean 4-5 inch diameter area surrounding intended puncture site
- Sterile Technique Maintenance: Use sterile gloves and maintain strict sterile field throughout procedure
- Site Protection: Cover cleaned area with sterile gauze if any procedural delay occurs
Step 5: Needle Insertion – The Critical Procedural Moment
Comprehensive Pre-Insertion Preparation:
Final Needle Preparation Protocol:
- Visual Inspection: Complete final inspection for needle defects, damage, or manufacturing flaws
- Bevel Orientation: Ensure needle bevel faces upward for optimal skin penetration and reduced trauma
- Hub Security: Confirm needle attachment security and proper connection to collection system
- Hand Positioning: Establish comfortable, stable, confident grip on needle hub assembly
Patient Communication and Preparation:
- Timing of Warning: Provide brief warning such as “small stick” or “sharp scratch” immediately before insertion
- Appropriate Timing: Give warning at precise moment of insertion, not too early to increase anxiety
- Reassurance Delivery: Use calm, confident tone to reduce patient anxiety and promote cooperation
- Breathing Instructions: Encourage normal, relaxed breathing pattern, discourage breath-holding
Straight Needle Insertion Technique and Methodology:
Optimal Approach Angle Determination:
- Standard Angle Range: 15-30 degrees below skin surface plane
- Angle Adjustment Factors:
- Superficial veins: Utilize lower angle approach (15-20 degrees)
- Deep veins: May require steeper angle approach (25-30 degrees)
- Skin thickness variation: Adjust based on individual patient anatomy
- Needle length consideration: Longer needles typically require lower insertion angles
Systematic Insertion Methodology:
- Skin Stabilization: Use non-dominant hand to anchor and stabilize skin below intended puncture site
- Needle Positioning: Position needle with bevel facing upward, aligned parallel with vein direction
- Initial Skin Penetration: Execute quick, smooth, confident motion through skin in single movement
- Controlled Depth Advancement: Advance slowly and carefully once through skin, observing for blood return
- Angle Adjustment: Decrease insertion angle once needle enters subcutaneous tissue space
Blood Return Assessment and Confirmation:
- Visual Confirmation: Observe for blood appearance in needle hub, tubing, or collection device
- Flow Characteristics: Assess blood flow rate, color, and consistency for normal parameters
- Position Adjustment: Make minor needle position adjustments if initial blood return is absent
- Systematic Troubleshooting: Apply logical approach to insertion problems and complications
Butterfly Needle Insertion Modifications and Techniques:
Wing Utilization for Enhanced Control:
- Grip Technique: Pinch plastic wings together between thumb and index finger for insertion control
- Stabilization Method: Use wings as stabilization platform during blood collection process
- Angle Management: Wings provide superior angle control and adjustment capability during insertion
- Patient Comfort: Reduced needle movement significantly decreases patient discomfort and anxiety
Tubing System Considerations:
- System Priming: May require tubing priming to eliminate air bubbles and ensure proper function
- Length Advantage: Extended tubing provides physical distance from needle for enhanced control
- Visual Monitoring: Clear tubing allows continuous real-time blood flow monitoring
- Collection Efficiency: May require gentle aspiration or positioning adjustment to initiate optimal flow
Comprehensive Insertion Problem Troubleshooting:
No Blood Return Situations:
- Position Assessment: Carefully evaluate needle depth, angle, and relationship to target vein
- Vein Location Verification: May have missed target vein or penetrated through posterior wall
- Gentle Repositioning: Slight withdrawal or advancement may establish successful blood flow
- Alternative Site Selection: If unsuccessful after reasonable attempts, remove needle and select different site
Slow or Intermittent Flow Problems:
- Needle Position Evaluation: May be partially in vein or positioned against venous valve
- Patient Position Adjustment: Modify arm position or overall patient posture for improved flow
- Tourniquet Verification: Ensure tourniquet remains properly applied with adequate pressure
- System Integrity Check: Verify vacuum tube integrity and collection system function
Always refer to your facility’s current protocols and manufacturer guidelines for specific product information and clinical applications.